Visual Basic offers a convenient way to draw boxes: the B option (Box) of the Line methbd.1f you include this option, you can draw a box whose upper-left comer is defined by the first ‘coordinate pair and whose lower-right comer is defined by the second coordinate pair, The last four commands in the Step option example could be replaced with the following lirae:
Line (100,400) – (200,700), , B
You must type the two consecutive commas if you omit the color argument; if you don’t, Visual Basic assumes that B is a variable name specifying the color of the box
As you may have guessed, there is an even easier way to draw a been the screen using relative coordinates. If all wanted was a rectangle with known :Hmensions and its upper-left corner fixed at point (100, 400), the following command would create just that:
You need to specify the coordinates of the upper-left comer and the dimensions of the box. The advantage of the last command is that you don’t have to perform any calculations you simply type the dimensions of the box, which is usually know
Filling Shapes
Closed shapes can also be filled with various patterns. clepeuding on the setting of the FillStyle property. By default, dosed shape- are tr msp.irent. To draw solid or hatched shapes, you must set rlu FillStylc: pro- I( rty, \A. hich can take any of the values shown in Table 6.3.
If the FillStyle I?roperty is 1and you still want to draw boxes filled with a solid color, use the BF option of the Line method. This option overwrites the FillStyle temporarily and. subsequent boxes are filled according to this property’s setting. The Circle method (discussed next) doesn’t have an equivalent option for drawing filled circles.
Using the Circle Method
The Circle method draws circles, arcs, and ellipses. The method’s complete syntax is:
Circle [Step) (X, V). radius, tcolor] , [start] ,[end] ,[aspect)
The coordinates of the circle’s center are X and Y, and R is its radius. These are the only mandatory ,)rguments, and they are expressed in units of the rur n-nt coordinate system.
Drawing Circles
The simplest form of the Circle method is Circle (X, V), R. The followmg statement uses It to draw a circle at the center of the Forrn l Form:
The circle’s radius equals one-third or the Form’s height, it the Form 1- taller than it is wide part or the ”:IITle m.,y be invisible
As with the Line command, the Step option makes the coordinates-of the center relative to the current point. Unlike the Line method, the Circle method doesn’t allow you to use the current point as the center of the circle and omit its coordinates: To draw a circle centered at the current point, use the following command:
Circle Step (0, 0), R
You must specify the relative coordinates, even if they are zero. You should specify the radius of the circle in the units of the horizontal axis. With most coordinate systems, you could use the units of the horizontal or the vertical axis; however, in a user-defined coordinate system, the units of the horizontal and vertical axes might be different. The circle won’t be distorted in any way, but you must be aware of this detail when defining the length of the radius, because it will affect the size of the circle.
Drawing Ellipses
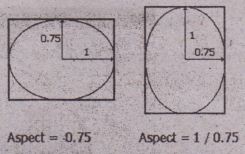
You can also use the Circle method to drawellipses if you include the aspect argument, Aspect is the ratio of the vertical to the horizontal radius of the e’ijipse and it can be an integer, froating~point number, or even less than 1, but it cannot be a negative number. If the aspect is smaller than 1, the ellipse extends horizontally and is squeezed in the vertical direction. If the aspect is larger than 1, the ellipse extends vertically. Figure 6.10 shows how the aspect ratio is defined. The two ellipses of Figure 6.W and their bounding boxes were drawn with the following statements:
Drawing Arcs
You also can use the Circle method to draw arcs. The arguments start and end specify the arc’s starting and ending angles in radians.
The. arc’s starting and ending angles are measured counterclockwise. Negative angles don’t reverse the direction of the arc. They simply tell Visual Basic to draw the arc as if they were positive numbers and then connect the endpoint that corresponds to the negative angle with the center of the 7ircle.As you may have guessed, this technique is used for drawing pie Charts Because circles (and connected arcs) are closed shapes, they are automatically filled with the patte~ sp~cified with the FillStyle property and take on the color specified by the FillColor property. For a discussion of these two properties, see the section “Filling Shapes,” earlier in this chapter.


