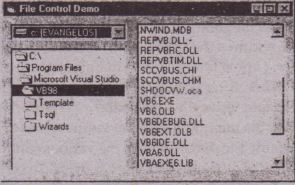
Three of the controls on the Toolbox let you access the computer’s file system. They are the DriveListBox, DirListBox, and FileListBox controls (see Figure 5.19), which are the basic blocks for building dialog boxes that display the host computer’s file system. Using these controls, the user can traverse the host computer’s file system, locate any folders or files on any hard disk, even on network drives. The file controls .are independent of one another, and each can exist on its own, but they are rarely used separately. The file controls are described next.’

.’. ,
Drivel.istflox Displays the names of the drives within and connected to the Pc. the basic property of this control is the Drive property, which sets the drive. to be initially selected in the control or. returns the user’s selection.
• Dirl.istbox Displays the folders of the current drive. The basic property of this control is the Path property, which is the name of the folder whose subfolders are displayed in the control.
• FileListBox Displays the files of the current folder. The basic property of this control is also called Path, and it’s the path name of the folder whose files are displayed.The three File controls aren’t tied to one another. If you place all three of them on a Form, you’Il see the names of all the drives in the Drivel.istbox. If you select one of them, you’ll see the names of all the folders under the current folder, and so on. Each time you select a folder in the DirListBox by double-clicking its name, its sub folders are displayed. Similarly, the FileListBox control will display the names of all files in the current folder. Selecting a drive in the DriveListBox control, however, doesn’t affect the contents of the DirListBox. To connect the File controls, you must assign the appropriate values to their basic properties. To force the DirListBox to display the folders of the selected drive in the DriveListBox, you must make pure that each time the user selects another drive, the Path property of the DirListBox control matches the Drive property of the Drive ListBox. The following is the minimum code you must place in the DriveListBox control’s Change event:
Similarly, every time the current selection in the DirListBox control changes, you must set the FileUstBox control’s Path property to point to the new path of the OirUstBox control
Pri vate Sub ··Dir1_Change()
filel.Path x Dirl.Path
End Sub
This is all it takes to connect the three File controls awl create a Form that lets users traverse all the disks on their computers. Although the Drivcl.istllox control displays all the drives and the DirUstBox control displays all the sub folders, in most cases you’ll want to limit the files displayed in the FileUstBox. To do this, use the control’s Pattern. property, which lets you specify which files will be displayed with a file-matching string such as “·.TXT” or 11997·.XLS” It’s also customary to display a list of available file-matching specifications in a Combobexcontrol, where the user can select one of them. The Combo Box control, shown in Figure 5.20, is populated when the Form is loaded and its selection is changed. The new file pattern is assigned to the Pattern property of the File control. Changes in the ComboBox control are reported to the application with two distinct events: Change (the user enters a new file pattern) and Click (the user selects a new pattern from the list with the mouse). Both events contain the following line of.code:

A program that scans the hard disk relies on the contents of these controls, and when it switches to a specific folder, it expects to find the names of the files in this folder in a FileListBox control. The ScanFolder application examined is a good example of the use of these controls, not only as elements of the user interface, but as functional elements of an application. To access the contents of the three File controls, use their List property, which is similar to the List property of the ListBox control. The DriveListBox and FileUstBox controls are linear; they display a list of drives and files, respectively, all of them being equal. To access the contents of these two controls use the List property with an Index value, which is e for the first item and Li stCount – 1 for the last item. The following two loops scan the drives and the files of the CUITI_’fltolder and print their names to the Immediate window:

Scanning the folders of the DirListBox control is a bit more involved because this control’s contents are structured. The folder names above the current folder are parent folders, and the folders under the current folder are subfolders. To access the sub folders of the current folder, use a loop similar to the previous ones :
The current folder is Oir1. L;st(-1) and the folders above (the parent folders) can be accessed with increasingly negative indices. The expression Oi1’1.Li st(-2) is tlte current folder’s pa. ent folder, ui rl. L;st( -3) its parent’s parent folder, and soon. There is no property that re~s the number of parent folders, so you can’t set Up:3 Per Next loop to scan the parent elements.One method is to create a While end loop like the following one:
‘When y u attempt to access a non-existent parent folder (with the expression Di r1.li st( -99), for instance), Vis al Basic won’t generate a runtime error, as one might expect. It will return an empty string, which yo~ can examine from within your code to find out whether there are more parent.folders or not,
The project ileDemo on the CD demonstrates the techniques for accessing the contents of the file controls. You can open the project in the Visual Basic IDE to experiment .rith ;t and see how it uses the List and ListCount properties of the various controf to retrieve their co tents and p,pnt them on a ListBox control.


